

It’s the official start of the grill season! There are quite a few tips and tricks that we’ve learned about grilling. We can’t say that we’re grill masters or the last word on food & fire, but we do know some fun hacks. These tips and techniques will certainly pump up your grill game, and will separate you from the weekend wanna-be grillers from those of us who are serious about making seriously great food on our grills. So, here are 5 of our favorite, and best, grilling tips to make you the star of outdoor parties – full of memorable flavors.

1. Start with a Clean Grill. Then Get It Well-Oiled
A very simple step, and certainly not one to skip. Invest in a good grill brush, and replace it when it gets worn. We’ve found that the best way to thoroughly clean our grill is to (1) get the grill hot, (2) dip the grill brush in water, then (3) scrub the grates. This will steam-clean your grill grates.
Oiling your grill grates will preserve your equipment, and it will be easier for you to flip food, and help create those cross-hatched grill marks that make grilled food so appealing. When you oil your grill grates, the type of oil matters. We use light olive oil (NOT EVOO) or safflower oil. Check out this article on CharBroil for a list of the best oils and how best to clean your grill.
2. Get Stable & Reliable Heat
If you are using a gas grill, this is fairly simple – although some gas grills will have natural hot spots and cold spots depending on how the heat vents from the grill. Our gas grill has back vents, so food gets hotter in the back of our grill. Just know where your hot/cold spots are. A laser infrared thermometer ($11.99 on Amazon) works, but the best fool-proof method is to use a loaf of bread. Check out this article on Food Network for the details.
The most consistent, stable heat we’ve gotten is from either our pellet grill (we have a Traeger) or our Green Egg. These grills have their limits, but they heat up quickly and maintain temperature. But our favorite grill by far is the simplest: our Webber kettle grill. They can be a bit trickier to get right, but there are plenty of experts that can help you out. This video from Chef Jason is really good:
3. Always Make Sure Your Grill Is at the Right Temperature for Your Food
This seems obvious, but we’re surprised how many times the backyard warriors screw this up. We know – we’ve done it. We took Aaron Franklin’s MasterClass session on barbecue and grilling, where we learned a bit more about picking the right temperature. For steaks (meat or fish) and chops: use high heat. For 1 inch thick steaks or chops, we typically sear with high heat for 3 minutes per side to get medium rare. For thicker cuts, we use the reverse sear method (low and slow roast at low temperature, then finish on high heat. For more information, check out click here to read our reverse sear article).

For meats that have lots of fat and connective tissue (pork shoulder and ribs), then low and slow work best (200º to 250º F). The best cut of meat to start with is pork shoulder/pork butt. Check out this article by MasterClass that uses the Aaron Franklin method. If you really want a challenge, then try your hand at beef brisket – the trickiest cut of meat to grill correctly. Warning: brisket takes a lot of time & patience, and making a decent brisket will take practice. A great starting point to learn more is again from Master Class that uses Aaron Franklin’s recipe. For the most part, chicken should be grilled at 350º to 450º F over direct or indirect medium heat. The only exception is when you’re smoking the chicken. Often used with wings or whole chickens, smoking meat involves indirect cooking over very low heat, 225º to 250º F, with the addition of smoldering wood chunks.
With vegetables, you will want hot & fast for watery veggies like zucchini, summer squash, and eggplant. Root veggies like beets and potatoes need low and slow – and root vegetables are best when they are wrapped in foil and roasted on or near the heat. Here’s a quick & easy recipe that we loved: We did a combo of carrots, brussel sprouts, and red cabbage, lightly coated with olive oil. We placed the veggies in a grill basket, then grilled using indirect heat with our Webber kettle grill. We tossed the veggies regularly for about 5 minutes, then salt and pepper immediately after removing from the grill. Apply another sprinkle of olive oil and a touch of balsamic vinegar – really yummy.

We always use an instant-read thermometer to check the center for the optimal temperature. Take your food off the grill before the desired done-ness, remembering that all food – meat, poultry, fish, and vegetables – will need to rest before serving because of carry-over cooking. The food will always increase in temperature from 5 to 15 degrees, depending on the thickness of the item.
4. Marinate!

This is probably the most important step with any grilling. The only time we don’t pre-marinate is when we have a perfect steak – and even then, we sometimes use the Florentine steak method (more about this below).
There are two formats for marinating any food are dry (rubs or spice blends) or wet (sauces, etc.) . For dry rubs, it’s as easy as 1, 2, 3:
- Rub & Refrigerate & Wait
- Warm to Room Temperature, Then Cook
- Add a Sprinkle of Dry Rub (as the meat rests)
When using any dry rub, make sure you pat the main ingredient to remove excess surface moisture with a clean towel (meat, fish, or vegetables). Be very generous when applying a rub – and, as the name implies, rub the ingredients gently into the meat, fish, or vegetable.
***THIS IS THE VERY IMPORTANT MASTER CLASS STEP: Tightly wrap the dry-rubbed meat, fish, or vegetable with plastic wrap (nothing else will really work). Put your protein into a container, placing it in the refrigerator for 2-4 hours at least. Overnight is best. For a more in-depth discussion on how to use dry rubs and spice blends, check out our full article HERE.
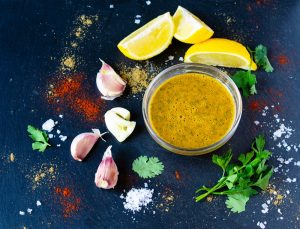 For wet marinades, the food science is similar to dry rubs: salt, sugar, spices/flavorings – with the addition of an acidic component (lemon, lime, vinegar, etc.) and other wet ingredients that add flavor such as soy sauce. We love marinades when we want to give our foods bold flavors. Our basic marinade is only a few ingredients:
- 2 tablespoons brown sugar
- 1/2 cup soy sauce
- 1 clove of garlic, minced
- 1/8 cup lemon juice
- 2 tablespoons oil (olive oil or canola oil)
Directions: Combine the first three ingredients, and mix well. Slowly whisk in the olive oil.
You can use this basic marinade on it’s own, or make hundreds of variations – for a full discussion on wet marinades, click HERE for our full wet marinade article.
In deciding how long to use the marinade, consider the texture of the meat, fish, or vegetable. In general, open-textured flesh like fish fillets or vegetables needs only a few minutes of soaking. Food with a tighter texture, such as chicken or lamb, can tolerate several hours in a marinade. Be very careful with pork, especially the leaner cuts such as pork tenderloin – marinate for 4 hours or less.
I like using marinades on vegetables, but using a slightly different method. I will allow the vegetables to “sweat” by salting first, then patting dry. I then let the vegetable marinate for 30 minutes to 1 hour; remove the vegetables from the marinade, then pat dry again. Saute with oil, or an oil and butter combination, then add back about 2 tablespoons of the marinade at the end for extra flavor.
Then there is the Florentine method, which we first learned during one of our foodie excursions to Italy. You can use this method with steak, chops, and fish steaks. Make the marinade:
- 2 tablespoons extra virgin olive oil
- 2 tablespoons balsamic vinegar
- 1 clove of garlic, minced
- 2-3 tablespoons of chopped fresh herbs (rosemary and basil are the preferred herbs)
- salt and pepper to taste
Directions: Combine the ingredients, and whisk well. Cook the meat or fish on the grill to preferred done-ness (and make sure that you account for the cross-over cooking). Place the meat or fish in a shallow baking dish, and spread the half of the marinade over the top. Cover, and let it site for 5 minutes. Turn the meat or fish over and spread the remaining marinade over the top. Cover, and let it site for 5 more minutes.
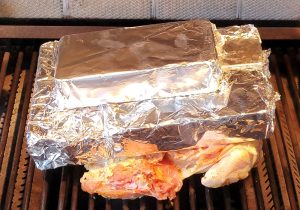
5. Use Bricks
We publihed our article on Shawarma Grilled Chicken a little while ago, where we used bricks to enhance flavor and cook to perfection. This is another trick that we learned in Italy. While watching a Tuscan grill master, we saw him wrapping standard masonry bricks with aluminum foil. After placing the meat (butterflied lamb) on his well-oiled grill (here we’re emphasizing well-oiled), he placed his aluminum covered bricks on top. The results were truly outstanding.
There are actually three grilling techniques to the Shawarma Grilled Chicken recipe that you’ll want to put on repeat this summer: (1) spatchcock (butterfly) your chicken, (2) flavor the meat with seasoning under the skin (as well as on top), and (3) grill under bricks. You’ll be amazed about how your chicken will taste when you apply these two methods next time you grill.
If you want to learn how to spatchcock a chicken, check out this easy how-to video by Chef Jack:
The Serious Foodie Master Class Grilling Set gives you a great start with some amazing flavors. Click HERE to order now.