
This recipe will give you a consistent product, and a great starting point in your sourdough journey.
Ingredients
- 500 grams bread flour about 3.5 cups flour
- 375 grams water about 1 3/4 cups. For the beginner, you can use 340 grams, or 1 1/2 cups. The more water, the lighter the bread.
- 10 grams salt about 2 tsp
- 2 grams yeast about 1/2 tsp - this is optional, but we got better results with a small amount of yeast.
- 50 grams sourdough starter about 1/4 cup
Instructions
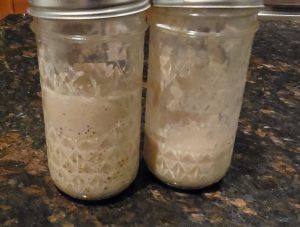
- Prep the Starter (The night before)Your starter should be fermenting 4-8 hours before using - and more than double in size.
- Mix the Dough (Morning)In a large bowl (preferably glass), mix flour and water (no starter or salt yet) using a silicone spatula. Let it sit for 30-60 minutes (this is called autolyse, which helps hydrate the starch granules and start gluten development). Remember - it's important to use purified water, not tap water (even if you have a whole-house filter).
- Add 50g sourdough starter, 2g yeast, and 10g salt to the dough. Mix thoroughly with a silicone spatula until incorporated. If you use your hands, make sure they are moistened. Whenever you handle the dough, have some water handy.
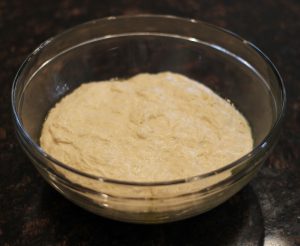
- Let the dough rest at room temperature in a covered bowl. Every 30 minutes, stretch and fold the dough (grab one side, pull it up, and fold it over. See text for a quick tutorial on stretch & fold). Do this 4-5 times over the first 2 hours. The dough should start feeling stretchy, less moist, and flexible after 2-3 times. You will also see the dough rise a bit.
- Let the dough rest at room temperature for 2 hours. The dough will almost double in size. This is called bulk fermentation.
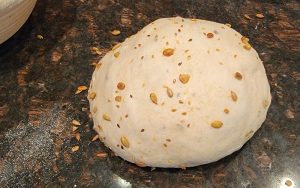
- Lightly flour a surface, gently shape the dough into a round or oval loaf. You might shape the loaf twice - you should see a "strong" surface, almost like an inflated balloon.
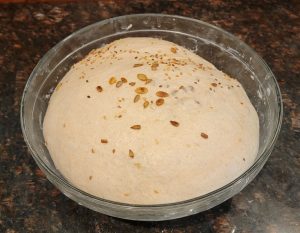
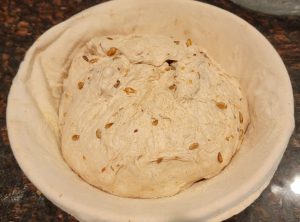
- Place it in a floured proofing basket (or a bowl with a towel and flour), seem side up. Allow the dough to proof at room temperature for 1.5 - 2 hours (see above text about choosing the proper proofing time). This is the second stage of fermentation.
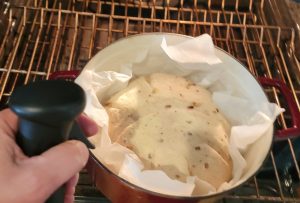
- About 15-20 minutes before the end of the second stage of fermentation, place a Dutch oven with the cover on in your oven and set the temperature to 450o F.
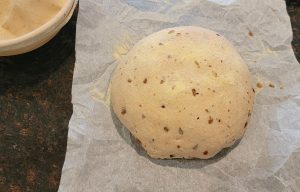
- Turn the dough onto a piece of parchment paper (seem side on the paper). Score the dough with a sharp knife or razor blade. There are a lot of videos on YouTube that do very cool scoring of bread - we stick to a few basic designs.
- Take the top off the Dutch oven, then place the dough - carefully! - into the Dutch oven. Mist the top gently with water, then put the lid onto the pot. Bake with the lid on for 30 minutes.
- Take the lid off the Dutch over - carefully! - then bake for an additional 20 - 23 minutes. The time will vary based on your oven, the outside temperature/humidity, and how crisp you want your bread. We like our crust extra crispy, so we found that 23 minutes is perfect for us.
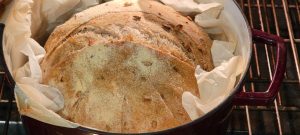
- Place the bread on a wire rack, and let cool for at least 1 hour.

Notes
There are many variations on this recipe you can try - for instance, you can see that we added seeds to the dough (during the last stretch & fold phase). We like a combination of sesame seeds, pumpkin seeds, and sunflower seeds.
You can also substitute some of the bread flour with whole wheat flour, semolina, spelt, or rye. A 30/20 ratio of bread flour to other flours is a good starting point.
There are many bakers that will put their dough in the refrigerator for bulk fermentation (after stretch & fold phase) for 12 to 24 hours. This will develop a different flavor profile, and worth trying. The recipe we've posted here will give you the quickest, most consistent result. But it really is about experimenting until you get what you want.